Quick Start
Subgraph is reserved for Arkhia's Paid tiers starting at 48$/month.
With Arkhia Subgraph, you can leverage Arkhia's enterprise-grade infrastructure to spin off your subgraph API and index cherry-picked data.
If you're unfamiliar with subgraphs and their capabilities, you can learn more here.
This guide will help you deploy your first subgraph with minimal effort. We will deploy a simple subgraph that listens to an ERC20 token transfer event.
This guide assumes that node.js and npm are installed on your machine. If not, you can download and install them from here.
Prerequisites
Before getting started, make sure you have completed the Arkhia API Quickstart guide.
To deploy your subgraph, ensure you have the following:
- Access to Arkhia Dashboard.
- At least one Project created on Arkhia Dashboard.
- A smart contract address on the Hedera network (optional).
- ABI file of the smart contract (optional).
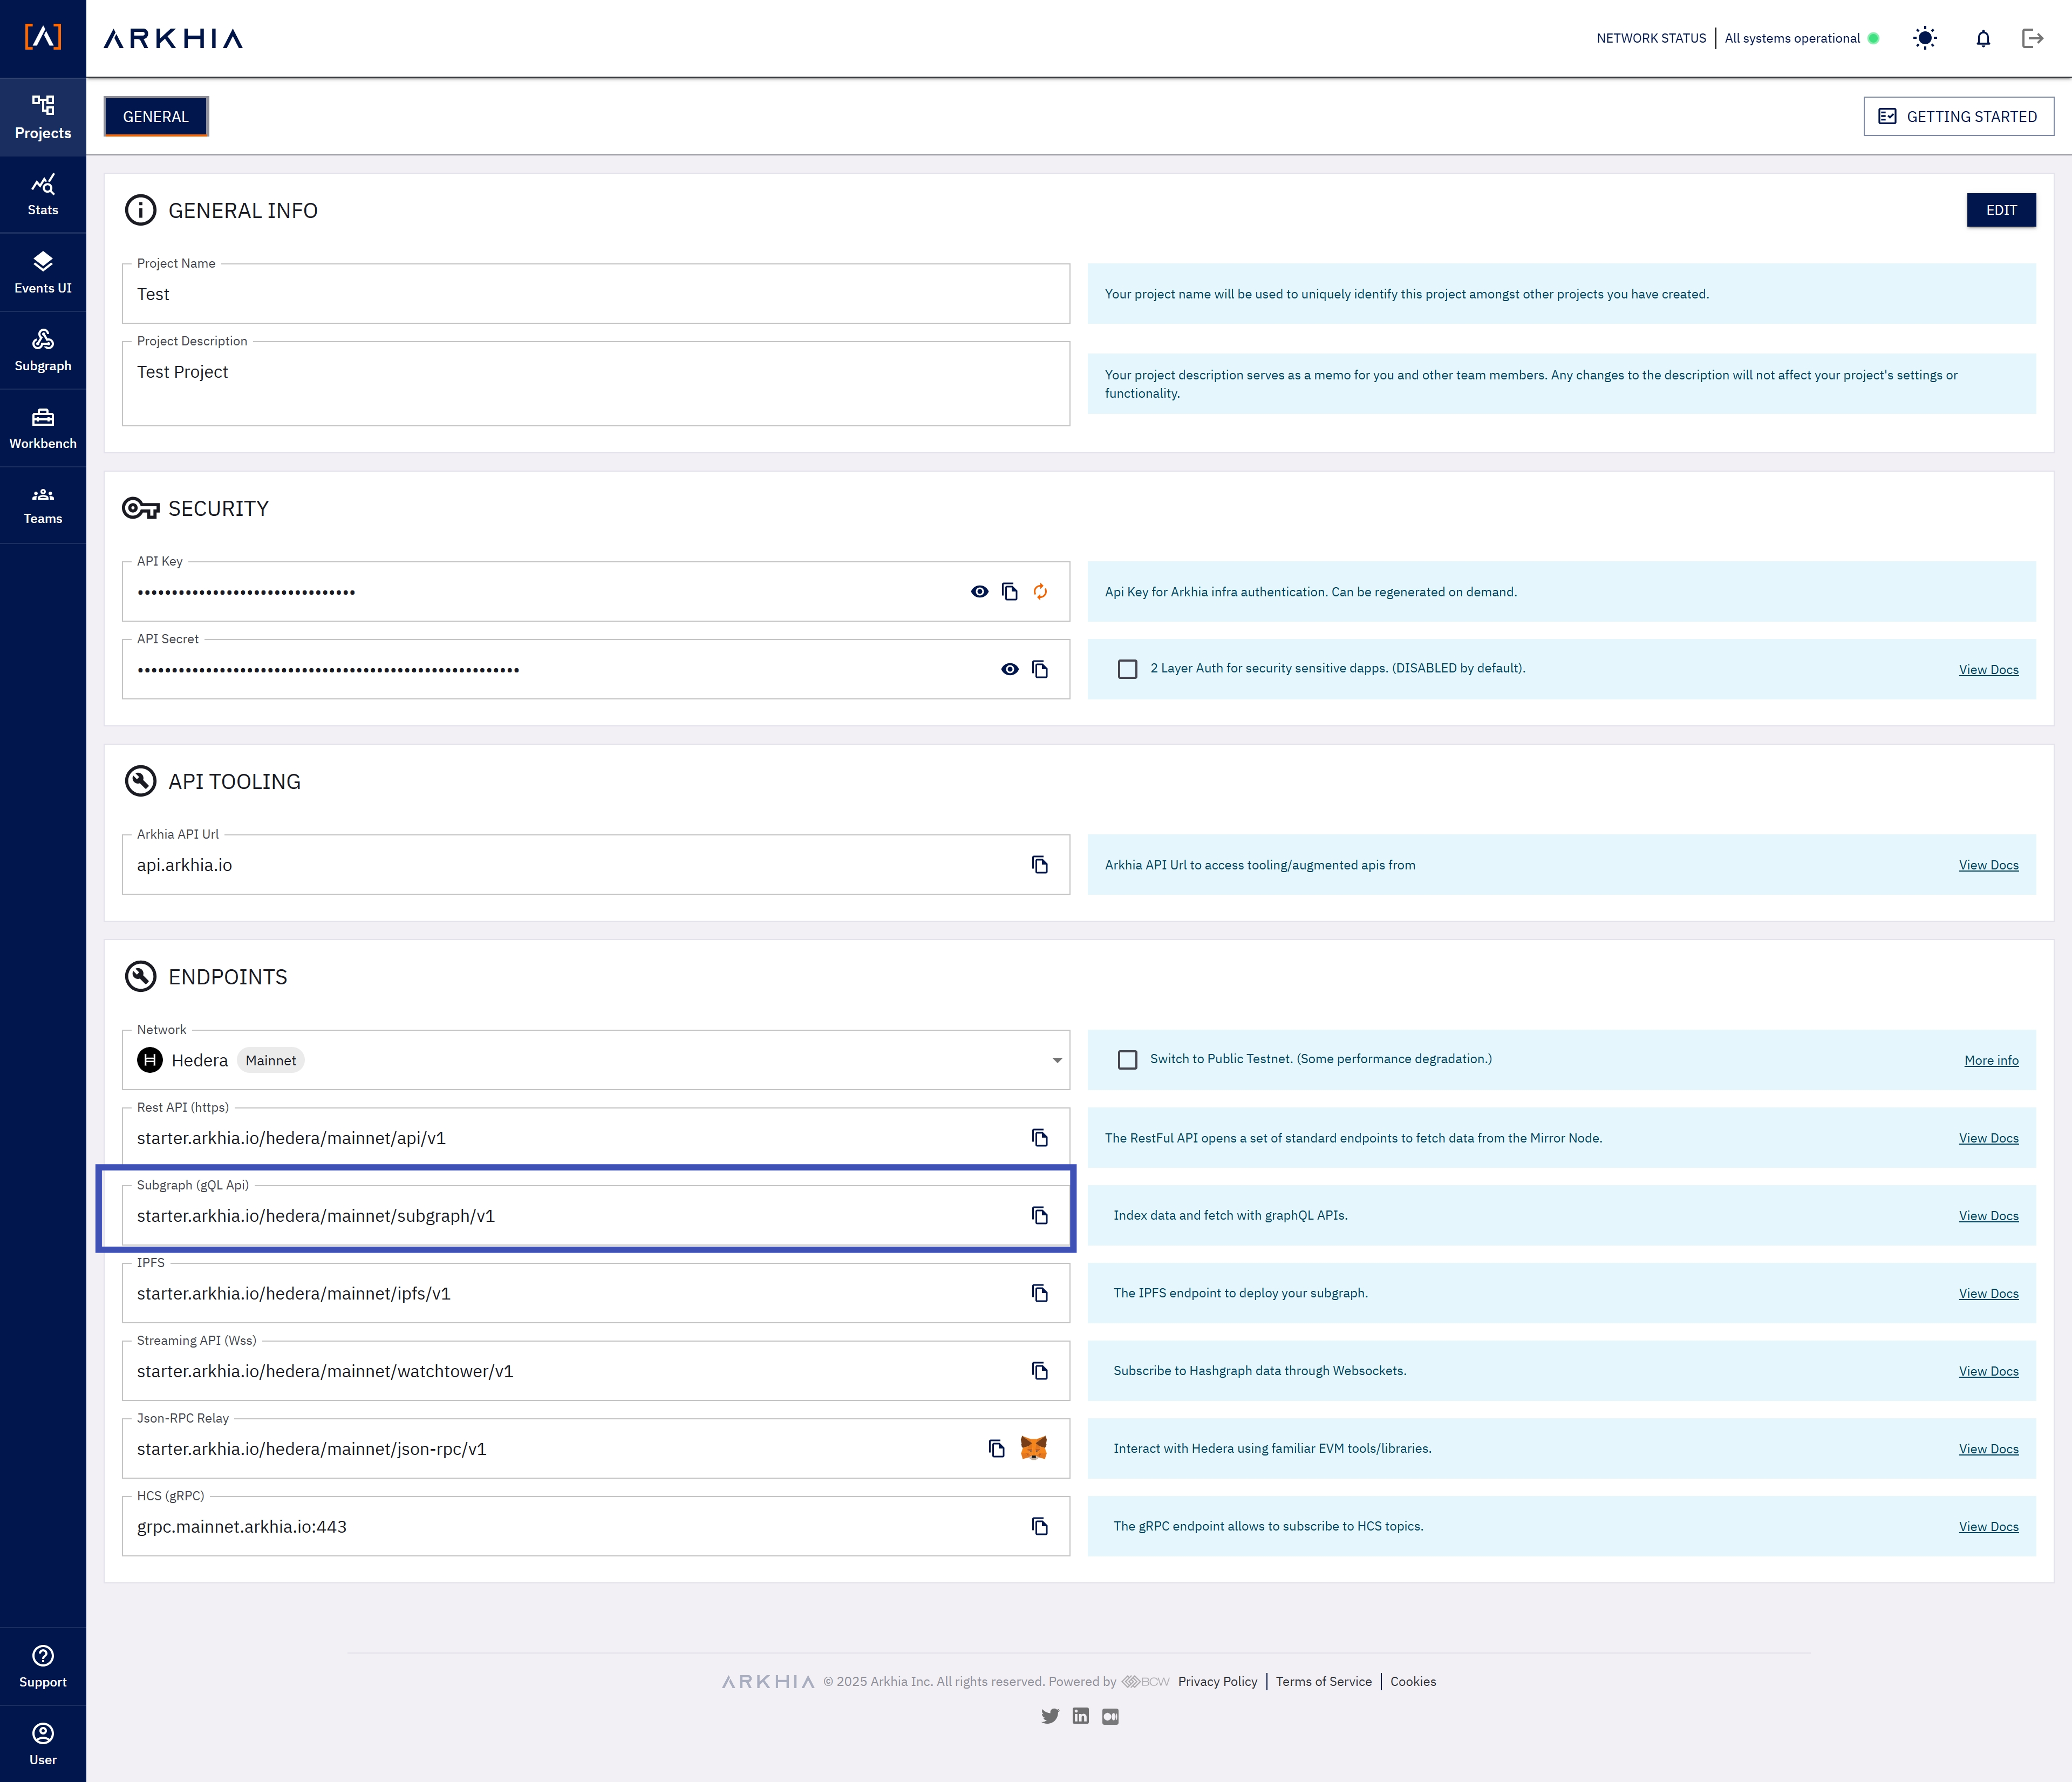
1. Fetch the API Endpoint from Arkhia Dashboard
Navigate to the Arkhia Dashboard and click Manage on the project you want to deploy the subgraph from. You will find the API endpoint under the Endpoints->Subgraph section. Copy the API endpoint and Security->API Key to use in the next steps.
We will be using the following environment variables in the next steps:
SUBGRAPH_ENDPOINT: The endpoint to deploy your subgraph.API_KEY: The API key to authenticate your requests.IPFS_ENDPOINT: The IPFS endpoint to deploy your subgraph.
If you don't see the IPFS endpoint, you can use the subgraph endpoint as the IPFS endpoint with minor changes by replacing subgraph with ipfs in the URL.
- Example:
https://starter.arkhia.io/hedera/mainnet/subgraph/v1->https://starter.arkhia.io/hedera/mainnet/ipfs/v1
2. Clone Arkhia-Subgraph-Quickstart Repository
Clone the Arkhia-Subgraph-Quickstart repository from here and navigate to the cloned directory.
git clone https://github.com/BCWResearch/subgraph-quickstart.git
cd subgraph-quickstart
3. Update the Environment Variables
Update the .env file with the API endpoint and API key you copied from the Arkhia Dashboard.
cp .env.example .env
Your .env file should look something like this:
# .env

#Arkhia Config
ARKHIA_SUBGRAPH_URL=https://starter.arkhia.io/hedera/mainnet/subgraph/v1
ARKHIA_IPFS_URL=https://starter.arkhia.io/hedera/mainnet/ipfs/v1
ARKHIA_API_KEY=YOUR_API_KEY

#SubGraph Config
GRAPH_CONTRACT_ADDRESS=0x00000000000000000000000000000000000bf929
GRAPH_START_BLOCK=59288563
GRAPH_NETWORK=mainnet
SUBGRAPH_NAME=erc20-transfers-quickstart
4. Deploy the Subgraph
npm install
npm run compile
npm run create
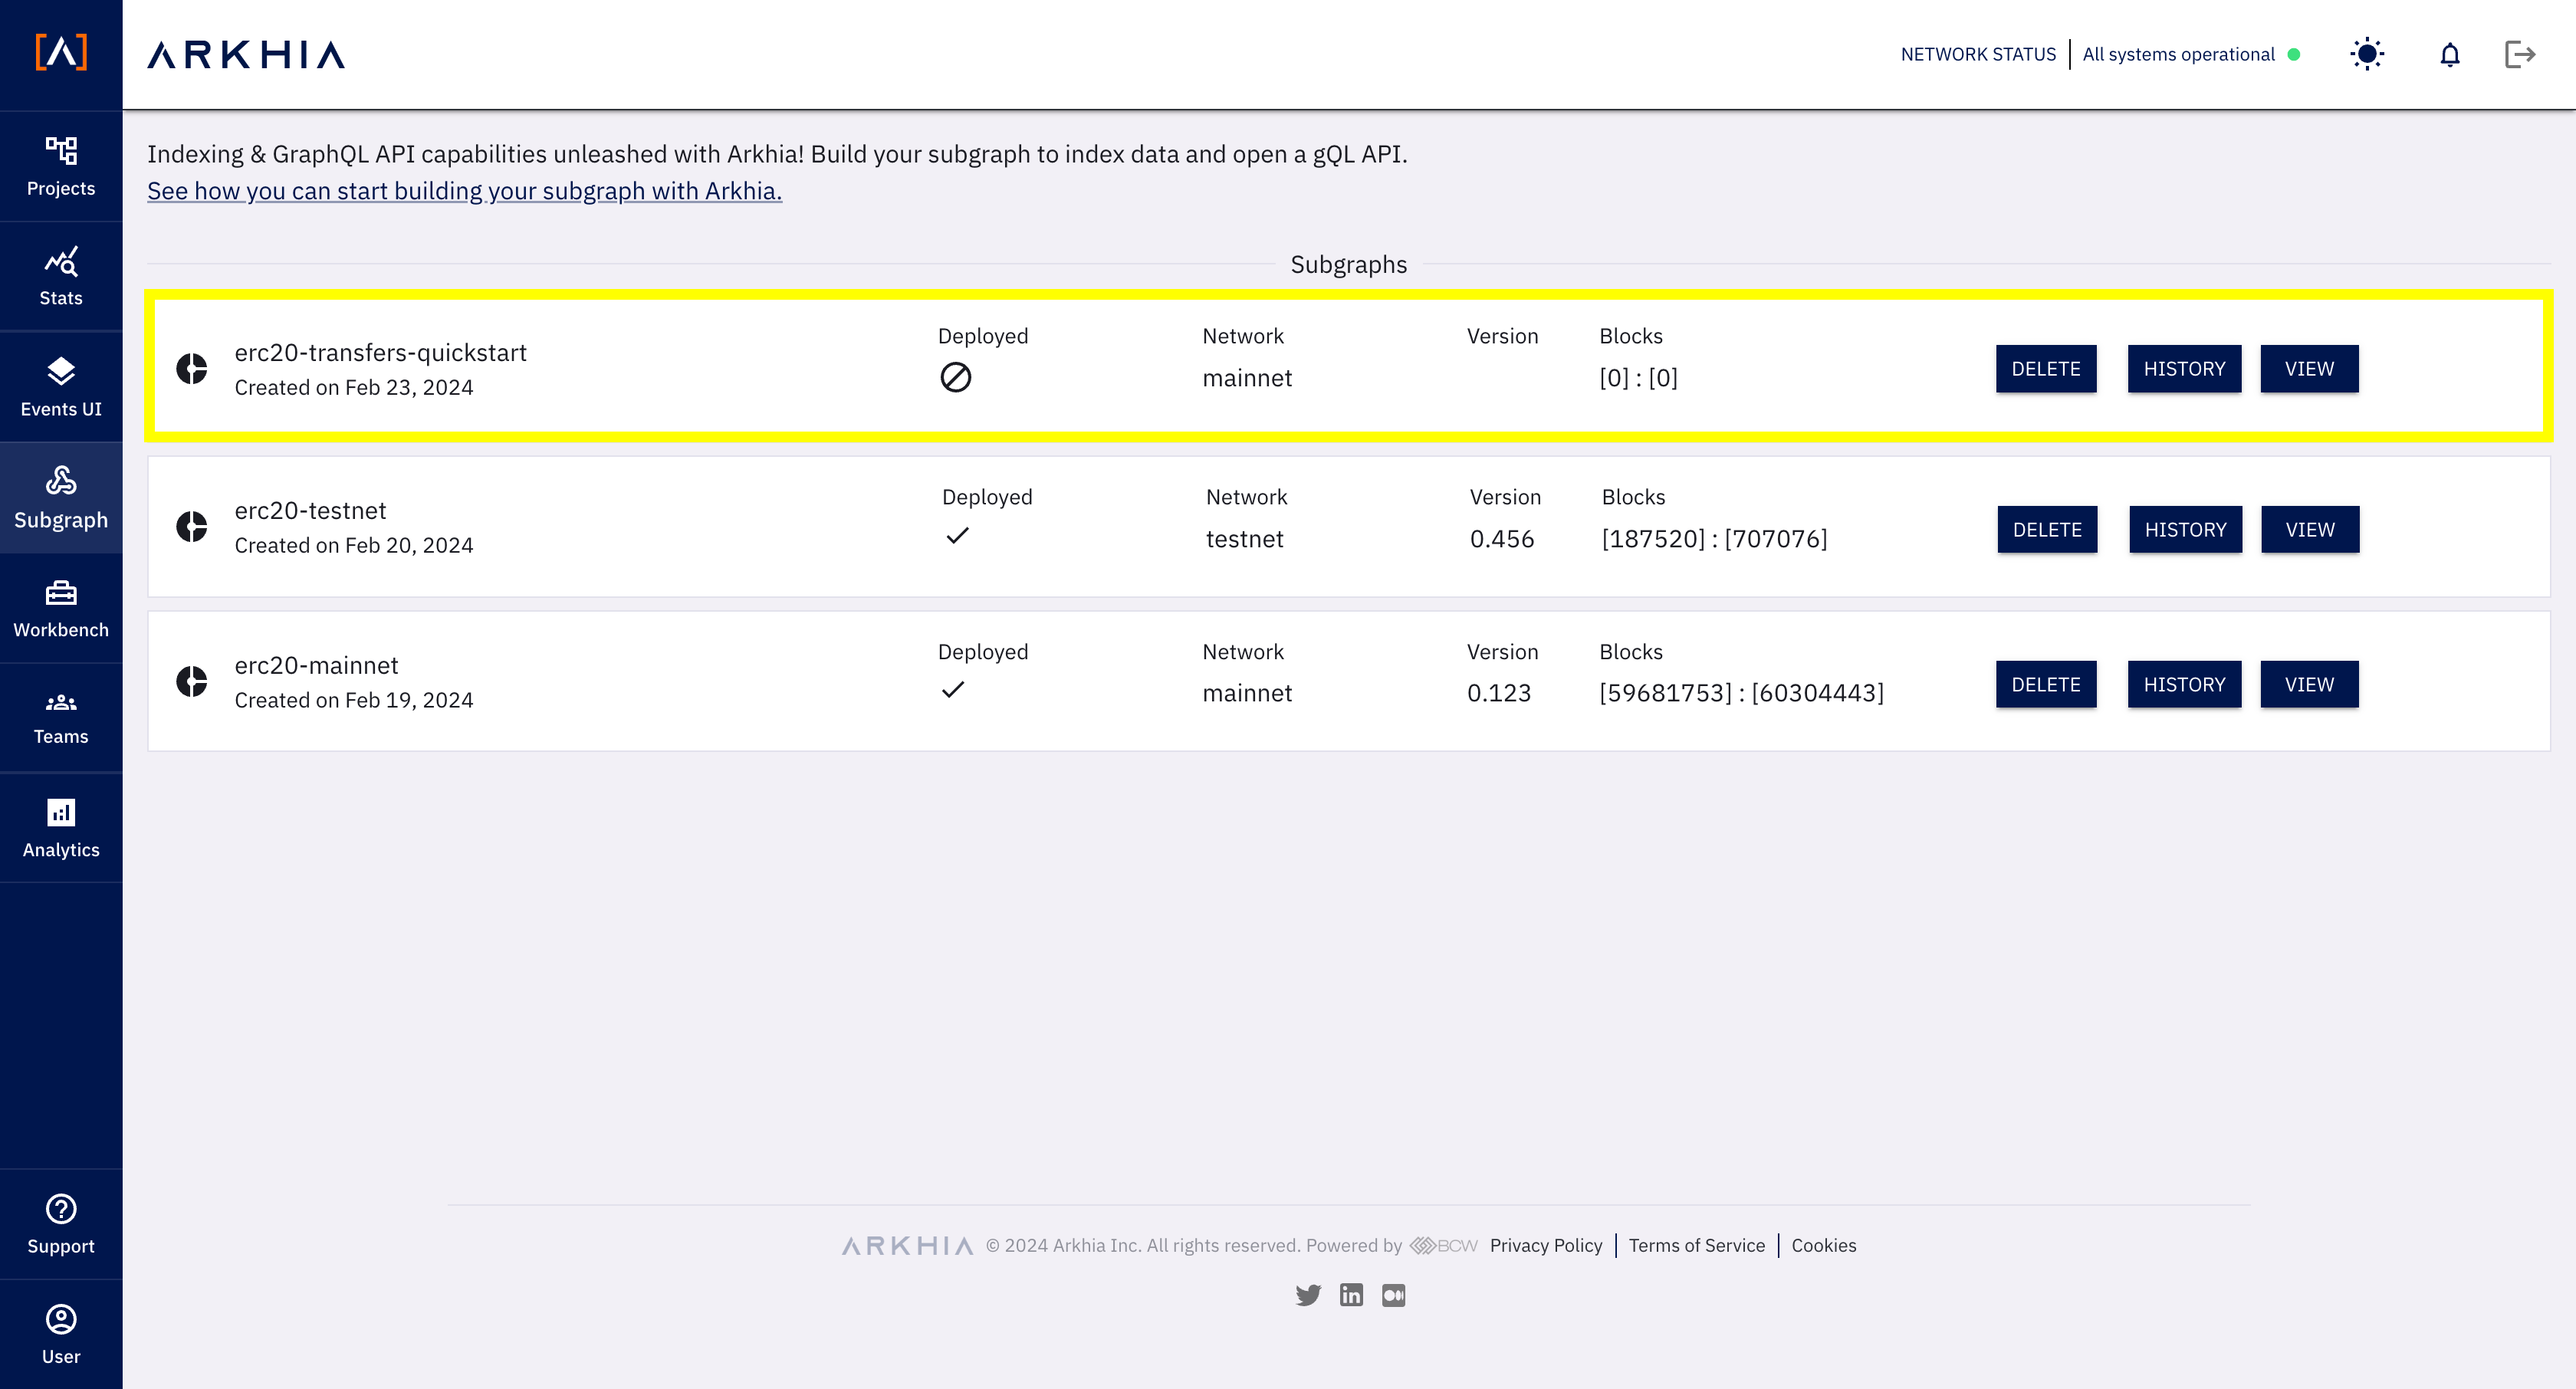
Once the subgraph is created, you will see the subgraph in the Arkhia Dashboard under the Subgraph section.
Now, deploy the subgraph to the Arkhia infrastructure.
npm run deploy
During deployment, you will be prompted to provide a version number. You can provide any version number.
If the deployment is successful, you will see the following output:
subgraph@arkhia subgraph-quickstart % npm run deploy

> subgraph-quickstart@1.0.0 deploy
> source .env && graph deploy --node ${ARKHIA_SUBGRAPH_URL}/${ARKHIA_API_KEY} --ipfs ${ARKHIA_IPFS_URL}/${ARKHIA_API_KEY} ${SUBGRAPH_NAME}

Which version label to use? (e.g. "v0.0.1"): 0.0.1
  Skip migration: Bump mapping apiVersion from 0.0.1 to 0.0.2
  Skip migration: Bump mapping apiVersion from 0.0.2 to 0.0.3
  Skip migration: Bump mapping apiVersion from 0.0.3 to 0.0.4
  Skip migration: Bump mapping apiVersion from 0.0.4 to 0.0.5
  Skip migration: Bump mapping apiVersion from 0.0.5 to 0.0.6
  Skip migration: Bump manifest specVersion from 0.0.1 to 0.0.2
  Skip migration: Bump manifest specVersion from 0.0.2 to 0.0.4
✔ Apply migrations
✔ Load subgraph from subgraph.yaml
  Compile data source: ERC20 => build/ERC20/ERC20.wasm
✔ Compile subgraph
  Copy schema file build/schema.graphql
  Write subgraph file build/ERC20/abis/ERC20.json
  Write subgraph manifest build/subgraph.yaml
✔ Write compiled subgraph to build/
  Add file to IPFS build/schema.graphql
                .. Qma4nnqHKvZfqhQBvW4BTjiobEf2bVMGZeMAf57YXK1Z2o
  Add file to IPFS build/ERC20/abis/ERC20.json
                .. Qmdc8yWGTNESYpEAoJZwFq931ohgC93p2ft7fqrEXXRoF2
  Add file to IPFS build/ERC20/ERC20.wasm
                .. QmNs43yTUHf4WLaBYGdQS8dYFBAFFWCr4M29BFr9NqGLV1
✔ Upload subgraph to IPFS

Build completed: QmZUtHaXWq2QLQPC2eyb2kjW1TkuBJF2svvYV3eaCfQ7UW

Deployed to https://starter.qa.arkhia.tech:8000/subgraphs/name/af021a48ff3558b278103a63b5deff2013bcdae937682212e904c2f6d18ffd56/graphql

Subgraph endpoints:
Queries (HTTP):     https://starter.qa.arkhia.tech:8000/subgraphs/name/af021a48ff3558b278103a63b5deff2013bcdae937682212e904c2f6d18ffd56

subgraph@arkhia subgraph-quickstart %
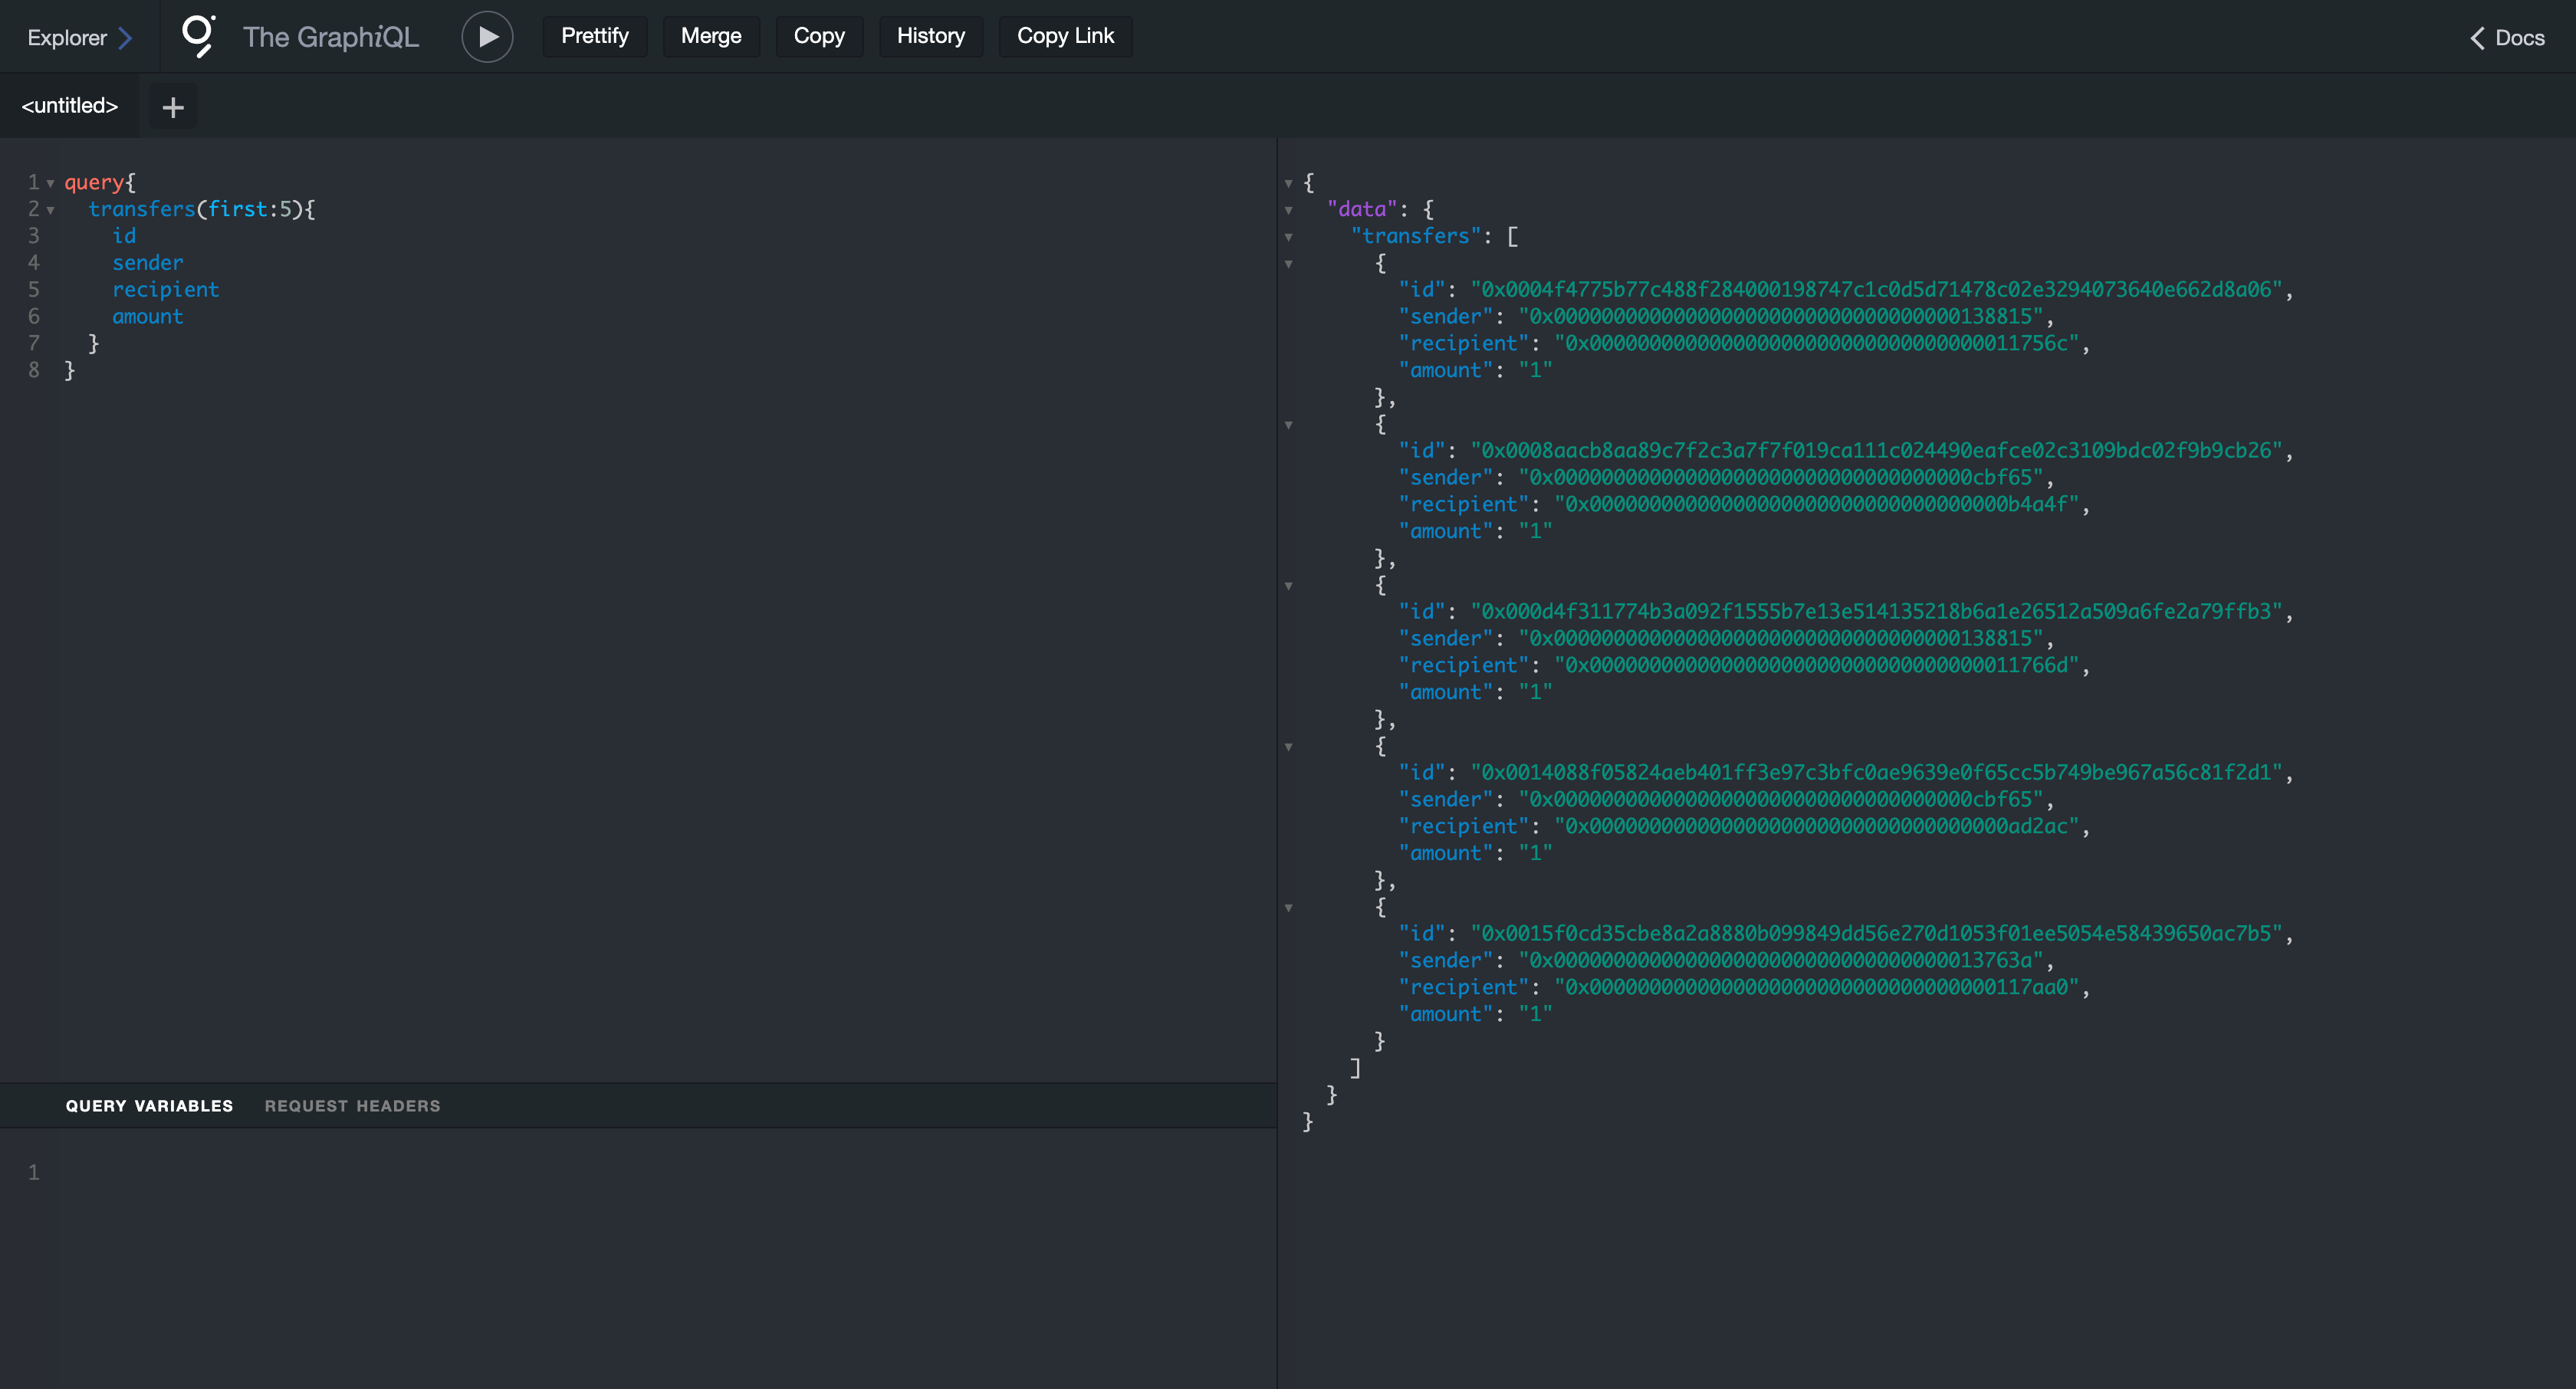
5. Query the Subgraph
Once the subgraph is deployed, you can go to the Arkhia Dashboard, click on the subgraph to see the details, and then click View to get redirected to the subgraph's explorer.
Write a simple query to get the latest 5 ERC20 token transfers.
query {
  transfers(first: 5) {
    id
    sender
    recipient
    amount
  }
}
6. Conclusion
Congratulations! You have successfully deployed your first subgraph using Arkhia's infrastructure. You can now leverage the power of Arkhia's infrastructure to index and query your subgraph data.
By this demo, you are ready to tinker with environment variables and deploy your custom subgraph.
For more information on subgraph development, you can refer to the Graph Protocol documentation.